Doryman hopes to take a trip to Scotland in 2013 to enjoy the festivities at the first St. Ayles Skiff World Championships. Hope you can come along!
Heres the invite that came in the mail today:
"The Ullapool Coastal Rowing Club is delighted to announce that Ullapool has been selected by the Scottish Coastal Rowing Association as the venue for the first World Championship for Coastal Rowing using the St Ayles Skiff. With the astonishing growth of St Ayles Skiff building and rowing by communities internationally the time is right to run a Skiffie Worlds to give an opportunity for Rowers from across the Globe to meet in friendly competition."
"Ullapool, on the banks of Loch Broom, a large sheltered sea Loch in the Northwest of Scotland, is an ideal location to host such an event. With an existing infrastructure developed to cater for the needs of visitors and great community experience in running large cultural events SkiifieWorlds will be well within the capacity of the village."
"Ullapool Coastal Rowing Club together with their partner organisations, the Loch Broom Sailing Club, Coigach Community Rowing and the Ullapool Harbour Trustees look forward to welcoming visiting crews to our magnificent waters. A full programme of maritime and landbased activities and entertainment is planned culminating with the Prizegiving followed by a boisterous Ceilidh Dance on Saturday 13th, 2013."
Its hard to pass up an invitation like that. Ive been promised that there will be "loaner" boats available for international guests who cant bring their own Skiffs.
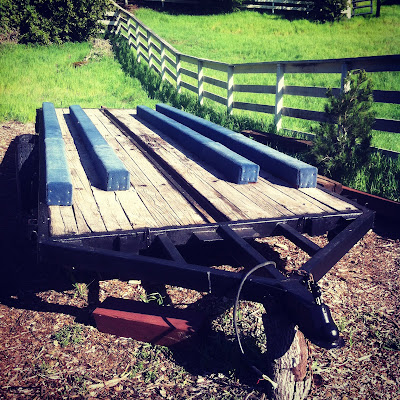
Remember the trailer? This one, the one that almost killed us?
We left the shantyboat hull pretty complete. Now that the boat is ready to be flipped, we turn our attention back to the trailer.
It is really a rusty, janky old thing. Ive owned it for fifteen years or so, or sorta owned it since I bought it with Sean for our Burning Man theme camp, the Costco Soulmate Trading Outlet. Its been stolen and recovered, broken and repaired on the road. We used to haul that thing back and forth loaded to the gills over the Sierra Nevada Mountains, taking our lives into our own hands. Then we realized that if we stored it in the desert, we could save wear and tear on our mortality. So there it stayed for about ten years.
When the camp realized it could buy a shipping container and have it dropped off at their campsite every year without the hassle of dealing with That Trailer, the poor thing got abandoned for a few years out in the Nevada wilds. You remember that I drove out to the desert with Alex to rescue our friend the trailer, a trip with nearly fatal results.
So here it is, a 20 foot flatbed, maybe suited to my shantyboat, maybe not, needing suspension work, a coat of paint, deck repair, and maybe some repair welds.
The first thing I did was fire up my cutting torch and cut off the weird distinctive triangle things, and ground down the cuts. I always assumed they were there as a token gesture to structural reinforcement.
I replaced all the deck bolts that had rusted through, grinding off and replacing any that had loosened. The deck needed about 50 new bolts. This alone made the deck much more stable.
I gave all the metal on the entire trailer, top and bottom, a new coat of Rust-Oleum. I had to get suited up to prevent myself from being painted too thoroughly, climbing under the trailer and applying paint overhead.
It looked pretty good when I was done. Though crawling around under the trailer, I saw several places where the metal was cracked, principally around the lateral beam that joined the two pairs of leaf springs on either side.
For a while, Id been sweating how to make the skids that would hold up the boat. I considered using recycled railroad ties since I could get them for free at the local trainyard, but their height and condition were too inconsistent. Eventually I got a ridiculous deal from a friend at the local lumberyard who found me some 6x6 treated lumber seconds that had a barely perceptible twist or were split a bit at one end.
I positioned the skids so one set would lie just inside of the skegs, and the other set so they lay at the outside edge of the trailer, as far out as could be secured. I figured this would support the boat along the stringers as well as give it side-to-side stability, something I thought would be extra important as we were trucking down the highway.
I drilled bolt holes through the skids and into the support brackets under the trailer.
I put big long 8 inch carriage bolts through the skids. For extra measure, I painted the bottom and tops of the carriage bolts. Lawrence joined me for a bit and serenaded me with excellent banjo tunes.
To prevent the skids from damaging the surface of the hull, I chamfered the sharp edges of the skids with my skill saw.
I cut the ends of each skid at an angle to guide the skegs while the boat was being trailered. Though honestly, I dont think the skegs at the back of the boat will be anywhere near the skids, since that end of the trailer will be deep under water and the back of the boat high above it during a boat launch or trailering. But it seemed like a good idea.
Then I covered the skids with indoor/outdoor low-pile carpet, stapling and using roofing nails at the edges.
The result was surprisingly legit looking.
Then Jen and I sat on the trailer and had a beer. Something about this trailer makes you want to sit on it and have a drink. Whats that about?
Next, the superhero of heavy duty welding flies the trailer high into the sky and melts it with his heat ray vision!
Its that time of year again. Spring Tweak time! I know, I know, its more of a midsummer tweak. Sorry, Im way behind schedule this year.
This years Spring Tweak is an inexpensive boom tent.
Most of the messabouts that I plan on attending this year require sleeping onboard the boat. Unlike Sucia Islands abundant camping, many of the other destinations we like to visit have limited camping. Saddlebag island, for instance, only has 5 campsites. Hope Island, only 4. Next week is the "Pocket Yacht Palooza", followed by a 4 day "Crooza" to several destinations which may or may not require sleeping onboard. Its also nice to have the option to tie up at a marina. And theres always the possibility I could be late getting home and have to anchor who knows where for the night. Having a boom tent onboard at all times really is a necessity. It doesnt have to be fancy in my opinion. A quick and cheap one made from a tarp will do just fine.
So heres my version of the classic tarp-type boom tent.
After quick trip to the local Harbor Freight Tools store, I returned with this 11 x 15 foot cammo tarp for a mere $16.49, and a grommet kit for another $4. $20 for a boom tent. Cant beat that.
They also carry the classic blue and silver tarps too, of course, but lets be honest. Theres really only one choice here. Not only does cammo look good, in a far-less-tacky sort of way, but it also enables one to go Stealth Camping. Stealth Camping, in case you are unfamiliar with the term, is the practice of arriving late at night, mooring up to someones private dock, boat, or any other no-camping area, and stealing away early in the morning before anyone realizes you were there. I, of course, would never do such a thing ;-)
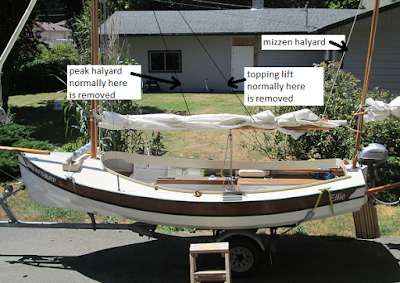
To support the tent I needed a ridgepole. I lashed my boom and gaff together and use them as the ridgepole. My topping lift/jackstay line, and my peak halyard both prevent draping the boom tent over the ridgepole, so they get disconnected. To support the ridgepole, I disconnect my mizzen halyard and connect it to the aft end of the ridgepole.
I measured the distance between the main mast and the point where the mizzen halyard connects to the ridgepole. Then I cut two equal length slits in the tarp so that the distance between the slits was equal to that measurement.
That allowed me to drape the tarp over the ridgepole.
The next part is simple, as the famous sculptor Michelangelo allegedly once explained:
After marveling at Michelangelo’s statue of Goliath-vanquishing David, the Pope asked the sculptor, “How do you know what to cut away?”
Michelangelo replied “It’s simple. I just remove everything that doesn’t look like David.”
So I got out my scissors and trimmed away everything that didnt look like a boom tent. I left some flaps at the front and rear of the boom tent so I could seal both ends off in a rainstorm.
The flaps can be rolled up and secured with a clip to keep them open, or tied down with a bit of rope to keep them closed. I trimmed the sides even with my lower rubrail.
When I removed the tarp and laid it out flat, it looked like this. Not an easy shape to define on a drawing. You can see why it really needs to be cut in-place.
The most difficult part about making a boom tent is coming up with a way to secure the sides. Several methods have been employed. Ropes can be strung under the boat from one side to the other. Clips or snaps can be added to the gunnels to attach the boom tent to. Ropes can be run fore-and-aft to provide an attachment point, and so on. But the easiest, most effective, and elegant solution I have seen my friends use are sandbags. Several small sandbags weighing about 1 lb each are fastened to the boom tent to weigh the sides down and keep them taught. They work very well and dont require a bunch of new holes to be drilled in the boat.
I didnt have enough time to make sandbags before our annual Sucia trip, so I improvised. I used 500ml plastic water bottles instead of sandbags. They actually worked quite well.
I drilled a small hole in the water bottle caps, tied them to the boom tent, and store the empty bottles under my front thwart. When I need them, I simply reach over the side and fill them with seawater and screw them onto the bottle caps. The only thing I dont like about them is they tend to bounce against the hull at night, keeping me awake. I think sandbags would be quieter so I plan on replacing them with sandbags soon.
My son Tim and I just got back from our annual Sucia Small Boat Rendezvous. It rained off and on the entire weekend, but we were cozy and warm under this humble boom tent, using our sleeping platform.
When we awoke in the morning, there were no signs of condensation or leaks anywhere inside the boom tent. We were very pleased with the results. Well worth the $20 to be sure.
A couple of months ago I posted this short Youtube clip about a fellow that exercised poor judgement in their approach to kayak packing. Well, after seeing a photo on Lees blog, apparently they are in good company. Head over to the link for the second instalment in the developing series of how not to pack your boat.
Its that time of year again. Spring Tweak time! This years Spring Tweak is a DIY tiller lock.
This tiller lock is fully adjustable, easy to make, unobtrusive, easily removed and set up, and only costs a few bucks to make. Ill show you how to make one.
Tiller Locks:
When it comes to tiller locking devices, theres certainly no shortage of them. Do a Google search for "tiller tamer", or "tiller lock" or something similar, and before you know it youll have spent your entire day looking at a bewildering assortment of different types, both commercially available and home made. Dont ask me how I know that.
Tiller locks generally fall into four main categories.
First, youve got your on-off lever action type, like this TillerClutch for example. These usually have a lever mounted towards the front of the tiller that allows you to alternate between locking the tiller in place, or allowing it to move freely. Its always locked or unlocked, theres no in-between.
Then theres the Solid Brace type. These consist of an adjustable rod that goes from the tiller to a box usually mounted on the seat back. Theyre designed to be rugged. The rod doubles as a tiller extender and can be easily detached to unlock the tiller. The rods length can be adjusted as needed.
Next, theres the Friction Knob type, like the ever popular Tiller Tamer. Here, a knob is used to adjust the amount of friction anywhere from very loose to a full lock.
Also using adjustable friction technology are a variety of DIY Shock Cord, Rope and Bungee types. These are usually home-made and can range from a single piece of rope stretched between two cleats, to devices constructed from bungee cords, fairleads, camcleats, blocks, hooks, and various other items.
Of course they all have their pros and cons. So how do you decide which one to buy or build?
What makes a good tiller lock (in my opinion):
Adjustability means flexability. I favor the devices that allow the friction to be adjusted from completely free tiller movement all the way up to a full lock. Dialing in just enough friction to hold the tiller in place still allows an occasional nudge to adjust the boats course.
Dont get in the way. Most devices have ropes that lead from the front of the tiller to the sides of the boat that block access to outboard motors, block seats, and so on. This can be a major drawback on a boat with limited space to begin with.
Quickly disabled and enabled. I want to be able to quickly and easily disable or remove the device when Im done using it, or in case of an emergency.
A DIY solution, inexpensive and easily constructed from readily available parts.
Strong, reliable, and should not be unattractive.
How my tiller lock works:
My tiller lock is a Friction Knob type. Tightening the knob pulls up on an eye-bolt, pinching a line against a strip of leather with increasing friction. The amount of friction is fully adjustable from very loose to a full lock. The friction between the rope and leather is smooth, consistant, and the leather will not wear out any time soon. It is not necessary to locate the tiller lock near the front of the tiller on a boat the size of mine, or on any boat with a well balanced helm. I located mine slightly forward of my aft coaming and ran the line almost straight across. There, the line is not blocking my way at all but still functions perfectly, so long as I keep the line free of slack. Two jam cleats on my coaming allow me to easily tension the line tightly. I can instantly remove the device by pulling the line off the jam cleats. A leather washer under the knob protects the tiller from damage and its friction prevents the knob from turning on its own.
Materials needed:
To make my tiller lock youll need a stainless steel eye-bolt and a few other small items that you can probably find lying around the house or garage. The eye-bolt I used is a Stanley V2161 that I got from Lowes for $1.28. Youll also need a small scrap of leather, a couple stainless steel screws, a short piece of rope, and a couple small scraps of wood. You may also need to purchase a couple small jam cleats. The knob can be made from a scrap of wood by tapping a threaded hole in it or using a threaded insert, or you can buy a threaded plastic knob at a hardware store for $2.60 like I did. Or simply use a stainless steel wingnut.
Building the tiller lock:
The lock is very simple and building it should be quite self-explanitory. Here is a cutaway diagram of how it goes together:
Youll need to drill a 1/4" hole through your tiller for the eye-bolt.
Make the bottom piece from a scrap of wood measuring 2-1/2" long by 1" high by 3/4" thick. I used white oak. Cut a 1/4" slot completely through it, long enough for the eye-bolt to fit through, and counterbore a couple of screw holes in it. Round off the corners.
Cut a strip of leather as wide as the inside diameter of the eye-bolt and long enough to wrap around the wooden piece. Leather from an old belt works fine. Insert the eye-bolt, then add the leather strip, holding it in place with glue or a couple brass tacks. Make a leather washer for under the knob. Drill the hole in the leather washer oversized so the eye-bolt can freely move up and down through it.
Anyone know anything about trailer tow hardware like sway bars and weight distributing whohaws and whatnots?
The shantyboat were planning will be trailer-able. So if Im gonna be towing a heavy-ass boat on a trailer down the road with a 20 foot double axle trailer with electric brakes, I want not to experience the sheer shit-in-your-pants life-flashes-before-your-eyes terror of a swaying trailer that I remember from my years hauling my theme camp out to the Black Rock Playa back in the day.
The weight of the boat, will be maybe 5000 lbs and change (but maybe as high as 7000 lbs). Ill be towing it with a 1970 Ford 3/4 ton F250. My old work truck. God, I love that thing. 500 bucks ten years ago. This is the only vehicle Ive shown the commitment of purchasing a stereo for.
Chicken John whos towed big stupid heavy things around for years says:
So that truck probably weighs about 5,000 pounds. If its a 3/4 ton, itll have a heavy duty front end, more springs in the back, bigger drums/calipers, beefier suspension all around and should not sway. If it does, I would look to a repair in the truck or changing the weight of the trailer around... maybe move the boat up or back a foot or two. you want like 400 pounds of tongue weight or so.
Swaying is death on wheels. Back in the day, with my smaller 64 F150, if we kept is slow, like 50 and under, all was okay, but if we went faster than that, terror.
I hear there are nifty things called sway bars and other fancy hardware that can allow my life to feel more secure. What do I need to look at if I want to maybe go 55 without dying?
Some helpful webpage about truck and trailer towing says:
The weight distribution hitch allows the Ford 250 to tow double the weight of the simple hitch. This hitch uses the same ball attached to the back of the truck. It adds two bars or tubes, stretching two feet back, under the frame of the trailer. Each tube connects with a chain to the trailer frame above it. When the truck slows down and the trailer wants to dip down, the tubes and chains prevent it from doing so. With this type of hitch, the trailer and the truck stay in the same plane. The trailer cant tilt forward and press the back of the truck down.
Im down with that. There are all sorts of variations apparently, sway controls, and weight distribution styles. I read about this until my head spun.
But again from Chicken:
Weight disribution or anti-sway bar... same same. I dont recommend them, but they are useful in over 8,000 pound applications. For you, with your 3/4 ton truck, it would be best to only tow inside your "towing capacity". Which I think you can do. However, if you find that your rig is not right after you hitch up and go on a trial run, you could try something like that. But as I said, if you are towing 5,000 pounds and you start to sway, its probably the truck needing a repair.
So I like to hear those soothing words, like "Youll be okay," and "You can do it," and "You probably will not die on the highway in the wreckage of your shantyboat." They warm my chilled little heart.
The Bartender line of fishing boats has a reputation as a superlative surf boat. The Coast Guard has used them as rescue vessels. As doryman everywhere know, a good surf boat is double-ended and is thus less likely than a square transomed boat to broach on a following wave.
Unfortunately the double-ended hull will not plane under normal, non-surfing conditions, no matter how much power they produce. So, George Calkins designed a spray skirt for his power dories to provide more lift at the stern.
The nineteen foot Bartender in the lean-to out in the boatyard has never been outfitted with a spray skirt, as far as I can tell, but it has one now. Frank, the current owner has been frustrated that this boat tops out at 10 miles-per-hour.
Now, that would be just fine with me. Mentioning this to Frank made him laugh.
If this were my boat, Id have no more than a ten horsepower motor on her and be happy just puttering around. The hull drives easily and this could be a very economical package.
The boat has a 40 horsepower motor however, and a rated speed of 25 - 30 mph, which is what we are trying to achieve. The bottom had a keel hog from sitting on a poorly designed, dilapidated trailer which probably contributed to its reduced performance. Ive stressed as much of the hog out as I could, reinforced some old, tired keelson framing and re-welded the offending trailer. All in a days work for a shipwright. The spray skirt was a challenge - the hull shape aft has such a radical camber that the face of the skirt is a helix. I laminated Oregon white oak using polyurethane glue and stainless screws. Didnt have to steam bend anything, but very near.
Frank will be camping aboard this boat at the upcoming Sucia Rendezvous so Ill be able to see first hand how all this works out.
Hope you all had a better solstice than I did. You can see what I was doing on the longest day of the year.
The spray skirt meets the chine at the stern, sweeps up past the waterline about half-way, then on to touch the bow in a fair curve.
Need to clean and polish that bronze half-round for a finishing touch.....
I also prepared some salmon for the Rendezvous. John St Clair is known locally as the Salmonator. He is a prolific fish killer. (many people find it confusing that I spend so much time on the water but dont fish. With friends like the Salmonator, why should I?). Recently he gave me a 20 pound salmon that had been in the freezer for awhile. The best thing to do with a fish thats a bit past its prime is smoke it. I dont have a smoker, so I slow cooked my fish. After marinating it in a brine and sugar mixture for 24 hours, it was spiced with garlic, onion, tariyaki and sesame seeds. It was then cooked at 170 degrees F, for six hours. Dessicated fish is not photogenic, so I will forgo any pictures. Take my word for it. Its delicious!


 First, youve got your on-off lever action type, like this TillerClutch for example. These usually have a lever mounted towards the front of the tiller that allows you to alternate between locking the tiller in place, or allowing it to move freely. Its always locked or unlocked, theres no in-between.
  Then theres the Solid Brace type. These consist of an adjustable rod that goes from the tiller to a box usually mounted on the seat back. Theyre designed to be rugged. The rod doubles as a tiller extender and can be easily detached to unlock the tiller. The rods length can be adjusted as needed.
 Also using adjustable friction technology are a variety of DIY Shock Cord, Rope and Bungee types. These are usually home-made and can range from a single piece of rope stretched between two cleats, to devices constructed from bungee cords, fairleads, camcleats, blocks, hooks, and various other items.


